Looking for a Mower Valve Adjustment video? Look no further.
Our video will guide you through the process in a simple, easy-to-follow manner. Whether it’s loud clicking noises or a loss of engine power, adjusting your mower’s valves is vital for maintaining its performance and longevity. Our comprehensive guide will take you through each step, ensuring you have the knowledge and confidence to carry out the adjustment yourself.
With professional tips and clear demonstrations, you’ll be able to get your mower running smoothly in no time. Say goodbye to engine troubles and hello to a well-tuned machine with our Mower Valve Adjustment video.
Credit: m.youtube.com
Importance Of Mower Valve Adjustment
When it comes to maintaining the performance and longevity of your lawn mower, the importance of mower valve adjustment cannot be overstated. Proper valve adjustment is crucial for ensuring that your mower’s engine functions optimally, preventing unnecessary wear and tear on essential components, and avoiding costly repairs down the line.
Signs Of Valve Misalignment
Detecting signs of valve misalignment is essential to maintaining the performance of your mower. One common indication is a loud clicking or tapping noise during startup. Additionally, a loss of engine power can signal the need for a valve lash adjustment. Identifying these signs promptly is critical to averting more significant issues and costly repairs.
Impact On Engine Performance
Ignoring mower valve adjustment can have a detrimental impact on engine performance. For instance, if left unattended, misaligned valves can lead to blue smoke emission, engine misfiring, backfiring, and unusual sounds such as rattling or tapping. Addressing valve misalignment promptly is crucial to sustaining the efficiency and functionality of your mower’s engine.

Credit: www.amazon.sa
Proper Valve Adjustment Process
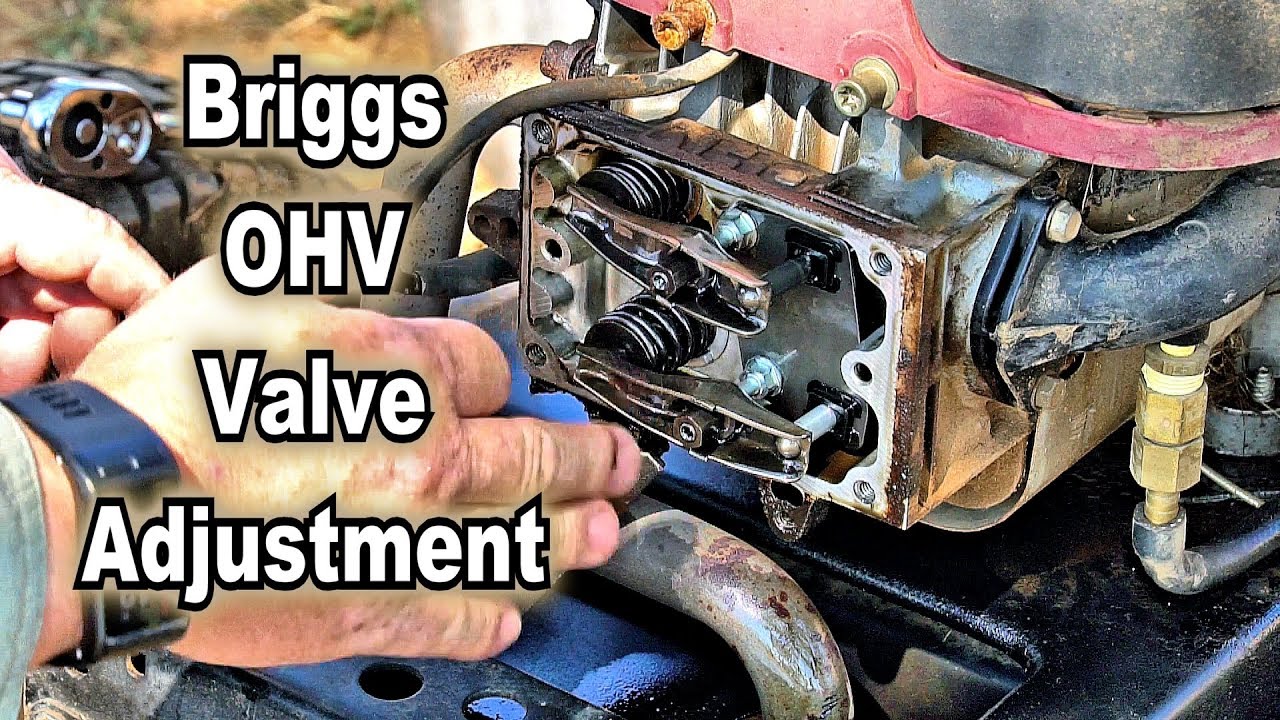
Identifying Valves
Identifying valves is the first step in the proper valve adjustment process. Before beginning the adjustment, it’s important to locate and identify the intake and exhaust valves on the mower engine. The intake valve is responsible for allowing the fuel-air mixture into the combustion chamber, while the exhaust valve is responsible for releasing the exhaust gases from the combustion chamber.
Rotating And Accessing Valves
After identifying the valves, the next step is to rotate and access them for adjustment. To do this, rotate the flywheel always in a clockwise direction to gain access to the valves. Additionally, removing the dowel and the lock nut is necessary to access the valves for the adjustment process.
Understanding Timing For Adjustment
Understanding the timing for the adjustment is crucial for the proper valve adjustment process. The timing involves rotating the engine by hand and adjusting the intake valve as soon as the exhaust valve begins to open. Once adjusted, continue rotating the engine until the intake valve opens entirely and just begins to close, and then adjust the exhaust valve. This step ensures that the adjustment is done accurately and in sync with the engine’s timing.
Tools And Techniques For Valve Adjustment
Learn to adjust mower valves with the help of a comprehensive video guide. Identify, rotate flywheel, and install adjusting bolt for optimal performance. Watch tutorials for step-by-step valve setting techniques without the need for specialty tools.
Necessary Tools For Adjustment
Essential tools for valve adjustment include:
- Feeler Gauge: To measure the gap between the valve and the rocker arm.
- Screwdriver: For loosening and tightening lock nuts.
- Socket Wrench Set: To access the adjustment bolts.
- Torque Wrench: For precise adjustment torque.
Specialty Tools For Precision
Specialized tools that aid in precise adjustment:
- Crowfoot Wrench Set: Facilitates adjustments in confined spaces.
- Valve Adjustment Tool: Ensures accurate valve clearance setting.
Common Mistakes To Avoid
Errors to steer clear of during valve adjustment:
- Incorrect Valve Gap: Can lead to engine performance issues.
- Over-Tightening: May cause valve damage or premature wear.
- Skipping Adjustment: Regular checks prevent major issues.
Step-by-step Valve Adjustment Tutorial
Learn how to perform a step-by-step valve adjustment on your mower’s engine with this easy-to-follow video tutorial. Keep your engine running smoothly and avoid potential issues by maintaining the correct valve clearance. Watch the video for expert guidance and tips on how to adjust your mower’s valves for optimal performance.
Step 1: Removal Of Components
To begin the valve adjustment process, you’ll need to remove certain components from your mower. Start by identifying the valves that need adjustment. Once you’ve located them, rotate the flywheel in a clockwise direction. This will make the adjustment process easier. Next, remove the dowel and the lock nut. Remember to keep track of these components so you can reassemble them correctly later on.Step 2: Setting The Correct Position
After removing the necessary components, it’s time to set the valves in the correct position. This ensures accurate adjustments. First, understand why valves can get out of specification. Then, re-install the adjusting bolt and use a crowfoot wrench set to hold it in place. This will prevent it from moving while you make the necessary adjustments.Step 3: Adjusting Valve Lash
Now it’s time to adjust the valve lash. Loosen the lock nut and turn the adjusting bolt to achieve the correct clearance. It’s important to refer to your mower’s manual for the specific measurement required for your engine. Once you’ve achieved the correct clearance, tighten the lock nut to secure the adjustment. Make sure to recheck the clearance after tightening to ensure it hasn’t changed.Step 4: Reassembly And Testing
After completing the valve adjustment, it’s time to reassemble the components you’ve removed and test your mower. Carefully reattach the lock nut, dowel, and any other components that were removed. Double-check that everything is secured tightly. Once reassembled, start the engine to test if the valve adjustment was successful. Listen for any abnormal noises or vibrations that may indicate further adjustments are needed. In conclusion, following this step-by-step valve adjustment tutorial will help you maintain the optimal performance of your lawn mower. Regularly checking and adjusting your mower’s valves can prevent issues such as loss of engine power and loud clicking noises. Remember to consult your mower’s manual for specific measurements and instructions for your engine. By taking the time to perform this maintenance task, you’ll ensure your mower runs smoothly and efficiently for years to come.Common Valve Adjustment Challenges
Valve adjustment for mowers can be challenging, leading to increased engine noise and loss of power. Our video simplifies the process, providing step-by-step guidance on identifying, removing, and adjusting the valve components, ensuring optimal performance.
One of the most common challenges that arise when it comes to valve adjustment is dealing with oil leakages. This can be an indication that the valves are not properly sealed, causing oil to escape and potentially damage other engine components. Addressing oil leakages is crucial to ensure the optimal performance and longevity of your mower.Dealing With Oil Leakages
To address oil leakages, it’s important to first identify the source of the leak. Check the valve cover gasket, as well as the valve stem seals, for any signs of wear or damage. If necessary, replace these components to ensure a proper seal. Additionally, make sure to tighten the valve cover bolts to the manufacturer’s recommended torque specifications, as loose bolts can also contribute to oil leakages. Regularly inspecting and maintaining the gaskets and seals will help prevent oil leakages and keep your engine running smoothly.Addressing Engine Noises
Another common challenge when it comes to valve adjustment is addressing engine noises, such as a loud clicking or tapping noise during start-up. This can be a sign that the valves are out of adjustment and need attention. Ignoring these noises can lead to further damage and decreased engine power. To address engine noises, you will need to perform a valve lash adjustment. This process involves adjusting the clearances between the valve stems and the rocker arms. Refer to your mower’s specific model and engine manual for the correct clearance specifications. Using the appropriate tools, carefully adjust the valves to the proper clearance, ensuring they are neither too loose nor too tight. This will help eliminate the noise and restore optimal engine performance.Preventative Maintenance Tips
In addition to addressing specific challenges, implementing preventative maintenance is essential to avoid valve adjustment issues in the future. Here are a few tips to keep in mind:- Regularly change the engine oil and filter to prevent oil contamination.
- Keep the air filter clean and replace it as necessary to ensure proper airflow.
- Inspect and clean the spark plug regularly, or replace it if needed.
- Listen for any abnormal engine noises and address them promptly.
- Follow the manufacturer’s recommended maintenance schedule.
- Consider using high-quality fuel to reduce carbon buildup and improve overall engine performance.
Credit: www.ebay.com
Frequently Asked Questions Of Mower Valve Adjustment Video
What Are Symptoms Of Valves Out Of Adjustment?
Symptoms of valves out of adjustment include loud clicking or tapping noises at startup and loss of engine power.
What Should Valve Clearance Be On Briggs And Stratton Engine?
The valve clearance on a Briggs and Stratton engine should be adjusted according to the manufacturer’s specifications. It is recommended to rotate the engine by hand and adjust the intake valve as soon as the exhaust valve begins to open.
Continue rotating the engine until the intake valve opens fully and just begins to close, then adjust the exhaust valve. The process should be completed for each cylinder.
What Is The Proper Valve Adjustment?
To properly adjust the valves, follow these steps: Rotate the engine by hand and adjust the intake valve when the exhaust valve begins to open. Continue rotating until the intake valve fully opens and just begins to close, then adjust the exhaust valve.
Repeat for each cylinder.
Conclusion
Achieve optimal mower performance with proper valve adjustment. Say goodbye to engine noise and power loss! Follow the easy steps shared in the video for smooth operation. Address valve issues promptly to ensure your mower runs efficiently. Your lawn will thank you for the care!